-
STRUCTURAL CALCULATIONS
-
PLANNING DESIGN
-
BUILDING REGULATIONS
-
PARTY WALL SERVICES
DISCOUNT PLANS LTD
Architectural Design Studio
DO NOT MAIL ANY DOCUMENTS TO ANY LISTED DPL ADDRESS
EMAIL DOCUMENTS ONLY TO discountplansltd@gmail.com FOR GUARANTEED DELIVERY
CONNECTING 2x DORMERS TOGETHER
1 NEW AND 1 OLD FOR PARTY WALL MATTERS
Navigating Dormer Design Challenges in Loft Conversions
When planning your dream loft conversion, adding that extra bedroom can be an exciting venture. However, if your neighbour has already constructed their dormer, you may encounter a few challenges. While your dormer design might aim to maximize the width within permitted development (PD) rules, the actual construction could face limitations. Builders often find it difficult to extend the dormer fully to the boundary due to access issues for tiling and installing lead flashings.
Typically, builders require a minimum gap of 400 mm to install side dormer tiles, fix lead flashings, and ensure proper construction. If your neighbour’s dormer was built first, this could result in your loft dormer extension being narrower than theirs, which would not be fair.
At Discount Plans Architectural Design Studio, we recommend appointing a Party Wall Surveyor to resolve these issues. By collaborating with your neighbours and obtaining a party wall agreement, you can potentially join the two dormers together. This will allow both properties to achieve a balanced design, ensuring equal widths for both loft conversions while not interfering with any approved drawings issued by the council.
What are all the BENEFITS of MERGING your new dormer to your neighbour's existing dormer?

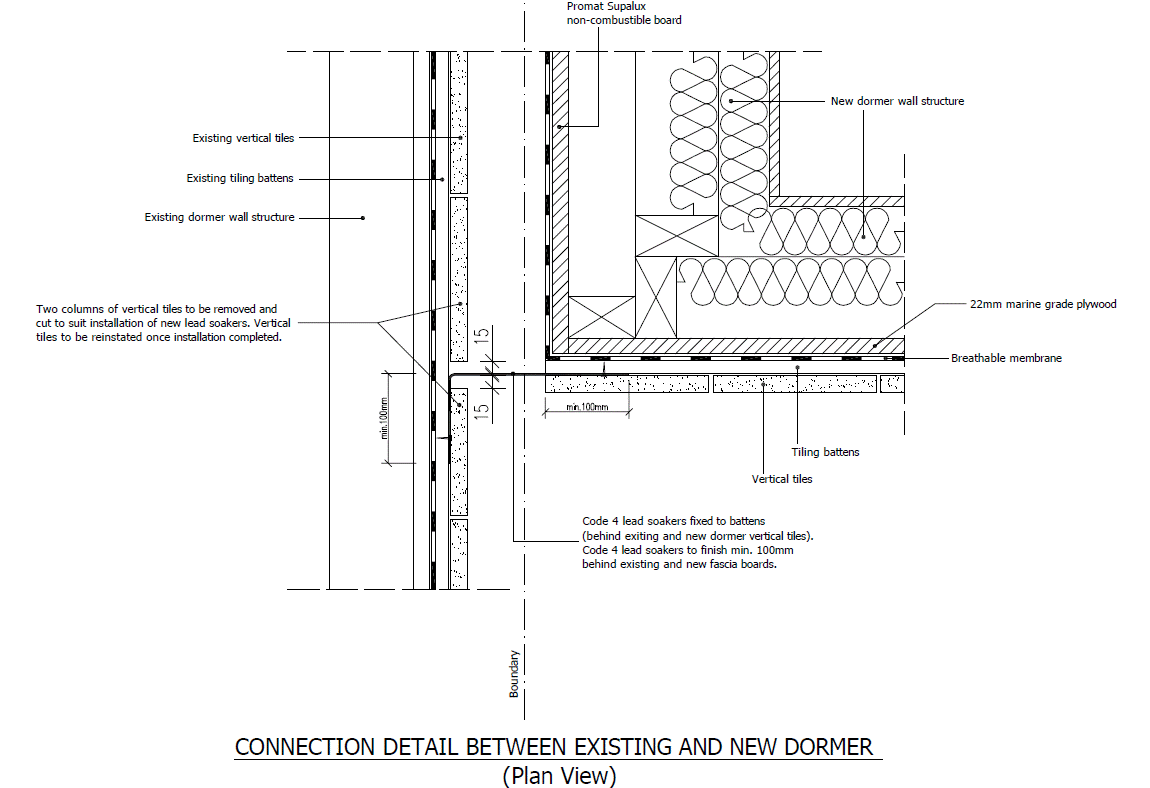
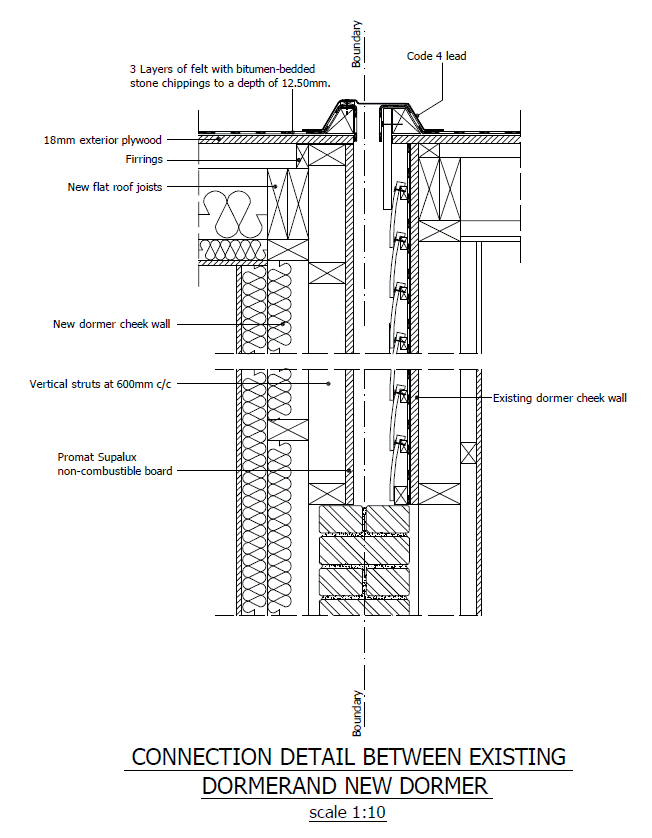
Connecting a new dormer to an existing dormer already built involves carefully integrating the structure, flashing, and roofing materials to ensure weatherproofing and a seamless appearance. Below is a put-together step-by-step explanation of how to connect a new dormer to an existing dormer, with specific details about sealing with lead flashing and interlocking tiles on the rear face wall.
At Discount Plans Ltd, our design team specialises in preparing these merged connections and weathering details as they are added to the completed awards issued by the Party Wall surveyors. It is common practice to liaise with party wall surveyors that request these details to be accurate as builders will use the details to construct from.


All the important factors to take into consideration will be met in the following areas:
1. Assessment and Planning
Structural Assessment: Before beginning, assess the existing dormer structure to ensure it can support the additional load of the new dormer. Check for any structural issues, such as rot or damage, that need repair.
- Design and Measurements: Plan the size, shape, and position of the new dormer in relation to the existing dormer. Ensure that the design complies with local building codes and regulations.
2. Framework Construction
- Cut Roof and Install Dormer Frame: Carefully cut the existing roof where the new dormer will be attached. Construct the framework for the new dormer using timber, ensuring the new frame aligns with the existing dormer's structure.
- Join Dormer Structures: Securely join the new dormer's framework to the existing dormer using appropriate fasteners, brackets, and joists. Ensure that the connection is strong and capable of withstanding environmental stress.
3. Roofing and Wall Integration
- Roofing Alignment: Align the new dormer's roof with the existing dormer roof. The roof pitch should be the same to allow for smooth water runoff and aesthetic consistency. The connection point should be sealed with proper underlayment to prevent leaks.
- Interlocking Tiles on Rear Face Wall: Where the new dormer connects with the rear face wall of the existing dormer, remove some of the existing tiles. Install new tiles that interlock with both the existing and new tiles. The tiles should overlap appropriately to ensure that water runs off correctly and does not penetrate the joint.

4. Lead Flashing Installation
- Prepare Lead Flashing: Use code-compliant lead flashing, typically with a thickness of 1.8mm to 2.0mm, which is durable and flexible enough to shape around dormer structures.
- Install Lead Flashing Around the Joint:
- Chase out mortar joints on the existing dormer wall where the new dormer will join. This creates a slot to insert the lead flashing.
- Insert the lead flashing into the chase, ensuring it covers the joint between the new and existing dormers. The flashing should extend a minimum of 150mm up the new dormer walls and cover the roof's edge. The flashing is then dressed down over the roof tiles or slates to direct water away from the joint.
- Secure the lead flashing with lead wedges and seal the chase with lead-compatible mortar to ensure a tight fit.
- Overlap Flashing: Ensure that each section of lead flashing overlaps the one below by at least 100mm. This prevents water from seeping in through the joints. Use a suitable sealant where the flashing overlaps to provide additional waterproofing.
5. Waterproofing and Final Inspection
- Check Seal Integrity: After the lead flashing and tiles are installed, inspect the joint to ensure no gaps or loose areas could allow water infiltration.
- Conduct a Water Test: Spray water over the joint area to check for leaks. Address any leaks immediately by adjusting or adding additional flashing or sealant.
- Final Inspection: Check the overall dormer connection for structural integrity, flashing coverage, and tile alignment. Ensure everything is securely fastened and weatherproof.
6. Finishing
- Internal Finishing: Once the exterior is weatherproofed, proceed with internal insulation, drywall, and other finishing touches inside the new dormer.
- Exterior Cladding and Trim: Apply cladding or trim to the new dormer to match the existing dormer, ensuring a seamless appearance.
By following these steps, the new dormer can be effectively connected to the existing dormer with proper waterproofing, using lead flashing and interlocking tiles, ensuring both structural integrity and aesthetic continuity.

What are all the BENEFITS of NOT MERGING your new dormer to your neighbour's existing dormer? "coming from a builders point of view"
As a builder, I'll explain why keeping dormers separate from neighbouring properties is generally the better choice:
1. Sound Isolation
- When dormers are separated, you create a crucial air gap that significantly reduces noise transmission
- Linked dormers effectively create a sound bridge between properties, allowing noise to travel through shared structural elements
- You'll hear much less of your neighbours' footsteps, conversations, TV sounds, or other daily activities with separate dormers
2. Structural Independence
- Separate dormers allow each structure to move and settle independently
- No risk of damage to your dormer if the neighbour's house experiences structural issues
- Easier to maintain, repair, or modify your dormer without affecting the neighbour's property
3. Water Management
- Individual dormers have their own drainage systems and flashing
- No risk of water ingress from poorly maintained neighbouring dormers
- Better control over guttering and water runoff
4. Construction Benefits
- Easier to build as you don't need to coordinate with neighbours
- Simpler to ensure proper weatherproofing at property boundaries
- Can be built at different times without compromising either structure
5. Privacy
- Creates better visual separation between properties
- Reduces the feeling of living in a connected space
- More flexibility in window placement without compromising neighbour's privacy
6. Maintenance Advantages
- Clear responsibility for repairs and maintenance
- No disputes over shared structural elements
- Easier access for painting, cleaning, and repairs
7. Resale Value
- More appealing to potential buyers who value privacy
- No complicated shared maintenance agreements
- Greater flexibility for future modifications
As a builder, I always recommend separate dormers unless there's a compelling architectural or planning reason to join them. The small loss in usable space is well worth the gains in privacy, noise reduction, and independence of structure.
If you need a Party Wall Surveying firm to assist you in any of the above matters, look no further.
Based in North London, specializes in resolving dormer-related matters between neighbouring properties.
Their expert team ensures a fair and balanced approach, helping you and your neighbours seamlessly merge dormers for optimal design and equal benefit to both properties.


Contact our team today for a free qoutation
Remember that if you are choosing more than one design you will be offered a further discount on any other second design.
We will not be beaten on price and if we are we will offer you a price match service in design* subject to agreement.
We hope you found this helpful article for your proposed loft conversion proposal, join1000s of other satisfied customers whom we have helped design to their tailored layout. Regards John. Domenech
CALL OUR TEAM ON
07838135957


